Cumulus VX Spine and Leaf

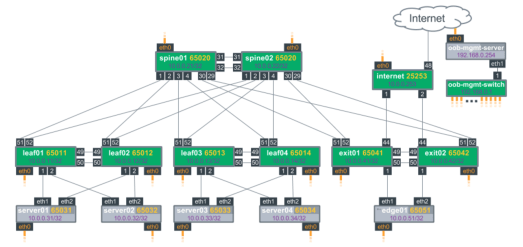
After hearing the word Cumulus twice from different initiatives on the same day, I decided I wanted to know more about Cumulus Networks in general, and playing with VX seems to be a great start. I am already running Vagrant and VirtualBox for other means, so having an additional box is easy. Well, the idea was just an additional box but after doing some GitHub investigative work, found out that there is already a pre-defined Cumulus Linux Demo Framework or Reference Topology available for consumption. I quickly followed this repository and built my own spine and leaf architecture:

cumulus

The whole process did not take more than 10 minutes. There is a lot that goes in the background, but still, not bad for a virtual non-prod environment or validation platform that supposedly has the same foundation as the Cumulus Linux and Cumulus RMP versions, including all the control plane elements.

The configuration is done on each of the VMs using the Network Command Line Utility (NCLU) or by editing the /etc/network/interfaces and /etc/frr/frr.conf files. This definitely requires some “essential” Linux skills. Multiple demos are available here using this topology, including NetQ. I have tested the config-routing demo and it worked perfectly with two spines, two leafs, and two servers. It uses an ansible playbook to push the configuration to the spine and leafs, as well as adding new interfaces to the servers for the connectivity test. A nice way to test the OSPF and BGP unnumbered concept. 

The fundamental piece is the FRR (Free Range Routing) responsible for EVPN, BGP, and OSPF functionality. Pete Lumbis did an excellent whiteboard session at Networking Field Day 17 by going over the building blocks followed by a demo on a similar topology running Cumulus VX.

Ansible Tower on Vagrant

I am still on the re-install apps land on the macOS, and this is a mini guide on how to install Ansible Tower using Vagrant for demo/trial usage only.

The first step is to install Vagrant if not already installed for other means. Vagrant relies on interactions with 3rd party systems, known as “providers”, to provide Vagrant with resources to run development environments.  I am running VirtualBox

To verify the installation of both Vagrant and VirtualBox:

vagrant --version

vboxmanage --version

Once the installation of both Vagrant and VirtualBox are completed, Ansible Tower can be initialized by creating a Vagrantfile with default instructions in the current directory as follows:

vagrant init ansible/tower

vagrant up

The process takes a few minutes the first time, and once complete:

vagrant ssh

The vagrant ssh command will give you your admin password and the Tower log-in URL (https://10.42.0.42). This is using the default (basic) settings in Vagrantfile and it can be edited further, including a more specific name for the ansible VM.

To verify the Ansible version:

ansible --version

At the moment, there are two trial/demo licenses available: one with enterprise features such as LDAP and Active Directory support, System Tracking, Audit Trails, Surveys, and one limited to 10 nodes and no expiration date, however, it does not include the enterprise features just listed. The open source alternative (or non-enterprise version) with no node limitation is the project AWX.

Below is the main (default) dashboard of Ansible Tower:

ansible tower

And here is a nice walk-through on the GUI: Ansible Tower demo.

Tip: if by any chance 10.42.0.42 can not be accessed the first time, check the routing table (ip r) and interfaces (ip a show) to see if 10.42.0.0/24 is listed on the Vagrant VM. If not listed, reinstall everything.