VCSA 6.7 on VMware Fusion

I am in the midst of reinstalling a lot of applications on my laptop after going through a complete reinstall of the macOS a few weeks ago, as direct upgrade to Mojave did not work for reasons I will probably never know.

In this process, I am now having to install all my virtual machines back into Fusion as part of my mini tiny home lab. The first one is the vCenter Server Appliance. After a few hours going through the “known” process of updating the .vmx file with “guestinfo” prior to power it on and not getting anywhere, I decided to ask google and luckly found the solution here posted by Moussa. At the moment this is the only one with guidelines for v6.7 that I managed to find. All others relate to v6.5 and still uses the manual editing of the .vmx file. More about earlier versions here.

For VCSA v6.7, here is the step by step summary:

1. Extract the .iso file and load the .ova under the vcsa folder as virtual machine
2. Choose the deployment option (in my case, tiny)
3. Edit the “Networking Configuration” section. This removes the need to edit the .vmx file manually as in previous versions. Sample below:

Screen Shot 2018-11-22 at 3.01.28 PM

4. The network settings can be changed at the initial boot from the default “bridge networking”, if required.
5. Once it is deployed, root password to be set, and remaining configuration to be done via the Appliance Management UI at [https://vcsaip:5480].
6. Important: during the “Set Up” process, the system name needs to match the “Host Network Identity”. If they do not match, it will not start.

Sample below (using IP instead of FQDN):

Screen Shot 2018-11-22 at 3.39.33 PM

Upon completion, VCSA is accessible at [https://vcsaip] with SSO details.

Note to self: always check google first.

Illumio Micro-segmentation at Scale

At Networking Field Day 19, Illumio launched the PCE Supercluster enhancement to their Adaptive Security Platform (ASP) solution, which will allow for a federated multi-region micro-segmentation architecture with centralized policy management and global visibility at scale.

Previously, Illumio presented at Networking Field Day 12, where the focus was an introduction to ASP and their policy model approach to micro-segmentation. Below is a recap of the base architecture and how PCE Supercluster comes into play.

Architecture Recap

The Illumio ASP is delivered in software only, agent-based, and it supports multiple operating systems, containers, network switches (via API calls), and cloud environments (via Security Groups), which is a competitive advantage for enterprises running a multitude of operating systems within compute and networking and are looking for policy consistency across domains, including cloud-based.

The architecture is composed by the Virtual Enforcement Node (VEN), a lightweight agent installed on workloads residing in any data center or cloud, and the Policy Compute Engine (PCE), which is the central brain that collects all the telemetry information from the VENs, visualizes it via real-time application dependency maps which is another must for any micro-segmentation strategy, and then calculates and recommends the optimal firewall rules or security controls based on contextual information about the environment, workloads, and processes. These rules are transmitted back to the VENs, which in turn program hosts, access lists or security groups depending on what is in the scope. The PCE can be deployed via SaaS or on premises.

The diagram below illustrates the major components along with the Application Dependency and Vulnerability maps which are displayed in the PCE.

architecture_web_april2018

PCE Supercluster

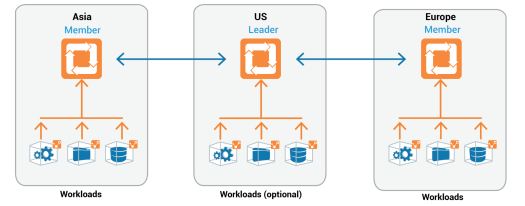
The PCE Supercluster is extending the ASP capability to provide global application visibility and federated security policies at scale across regions. According to Illumio, it is designed for enterprise-scale and globally distributed data centers. It provides organizations with global visibility into the connections and flows across its multiple data centers and enables them to centralize policies across federated PCEs. Compared to a single PCE, a PCE Supercluster provides multiple independent PCE failure domains and support for a significantly greater number of workloads.

In a PCE Supercluster deployment, one region or site acts as the leader while others act as members. The leader is defined as the master for the policy model (white-listed), and the members contain replicas of the policy model. In other words, all PCEs in the PCE Supercluster have the same information. The policy provisioning is always through the leader. All traffic between PCEs are encrypted via TLS.

Illumio leverages a role-based access control (RBAC) model to assign Application Owners, Audit, Security, and IT Ops the least required privilege they need to perform their jobs. This helps preventing unwanted changes across PCEs.

Below is a 3 regions deployment sample, which was also the topology used during the demo sessions.

supercluster

Demos

Illumio’s presented 5 demos covering Global Visibility and Policy Propagation, Global Policy Portability in the case of Application Disaster Recovery, Intra-Region PCE Resiliency, PCE Supercluster Disaster Recovery in the case of Inter-Region, and Vulnerability-based Segmentation. All these demos are available at the Tech Field Day portal.

Impressions

This was my first actual exposure to their solution and value proposition, and it has the potential to shake things around in a time where visibility and micro level segmentation are becoming so critical to augment perimeter security and prevent spread of breaches inside data centers and cloud environments. Illumio has a great development potential as well, considering the traffic data being gathered which could lead to sophisticated analytics.

Illumio’s Team:

PJ Kirner, CTO and Founder
– Wendy Yale, VP of Marketing
– Matthew Glenn, VP Product Marketing
– Anand Ghody, Technical Marketing Engineer

Matthew and Anand presented the demos and they were so well prepared and extremely creative. For each of the demo presented, a new t-shirt was used with the name on it. The synergy and communication were the highlights and gave us a great example (and reminder) of why team work is so important, and how perception is everything. It is definitely worth spending time getting to know what they are doing and their innovations.

docker for mac – base installation

As with most things, I need to try it out to actually understand how it works. This is a mini version based on the official getting started guide from Docker. There are two community versions available to be selected after installation: stable and edge.

Stable Edge
The Stable version is fully baked and tested, and comes with the latest general availability release of Docker. The Edge version offers cutting edge features and comes with experimental features turned on.

Since I am an absolute beginner, I am going with the stable version. This is the second time I am installing Docker, the difference this time is that I am documenting the installation and more serious about making use of it (eventually). It is an easy-to-install process with complete development environment for building, debugging, and testing “dockerized” apps on a Mac, and no need for Docker Toolbox depending on the macOS version.

The .dmg package will install the following components: Docker Engine, Docker CLI client, Docker Compose, and Docker Machine. The versions can be checked by adding –version:

$ docker --version

$ docker-compose --version

$ docker-machine --version

Prerequisite:  a DockerID created at the Docker Store. This is the same login used to access Docker Cloud, Docker Store, and Docker Hub services.

Docker Architecture

The illustration below depicts the Docker client-server architecture, where “docker” is the client when we input docker commands such as docker build, docker run and so on, and “docker daemon” is the server listening to docker requests and responsible to manage docker objects (images, containers, networks, and volumes). The docker registry is where images are stored, either private or in public registries such as Docker Cloud or Docker Hub – where most base images are available for consumption.

docker architecture

Docker Test

$ docker run hello-world

$ docker image ls

If it works, a message will be displayed indicating all the steps performed by Docker, such as the client contacted the daemon, the daemon then pulled the “hello-world” image from the registry Docker Hub (default) and created a new container from that image which runs the message displayed on the terminal. With the docker image ls, the image can also be seen. If by any chance it does not work the first time, docker login fixes it.

Done, this is how we can install and test Docker for Mac, and have it available for further use.

Kubernetes

With the newer releases of Docker for Mac, both Edge and Stable, a standalone (single node) Kubernetes server is included as well so we can deploy Docker workloads on K8s, which is something else I want to play with later on.

the beginning

During my first participation as a delegate at the Networking Field Day 19, I decided to start a blog and try something different. Over the years, I became more of a reader, socially speaking. In here, among other ordinary things, I want to write about tecnologies that I have been exposed to and also new technologies I am learning about. I hope this helps others who are also trying new things, as I have been inspired by a few colleagues in the industry who I admire and been following for years.

To be continued…